Renovating a bathroom starts with careful preparation, which sets the stage for a smooth and efficient demolition. Before removing any fixtures, it is crucial to clear the space completely, taking out personal items, mats, and accessories. Protecting adjacent rooms with plastic sheeting and drop cloths can prevent dust and debris from spreading, saving time during cleanup. Additionally, shutting off water and electricity ensures a safe environment to work in, minimizing the risk of accidents during the demolition process.
Understanding the layout of plumbing and electrical lines is equally important. Taking photos or notes can help during the rebuilding phase, reducing errors and unnecessary delays. Preparing the space properly lays the foundation for a streamlined renovation, allowing subsequent steps like removing tiles, cabinets, and flooring to proceed efficiently. Proper preparation ultimately saves effort, time, and money, while making the entire demolition process feel organized and manageable.
Choosing the Right Tools for Demolition
Having the correct tools can make the difference between a chaotic renovation and a controlled, efficient project. Essential tools for bathroom demolition include a sledgehammer, pry bar, reciprocating saw, and utility knife. Using specialized tools for tasks like tile removal or cabinet dismantling ensures a precise approach that protects structural elements and minimizes accidental damage. Selecting durable tools designed for the task can significantly reduce physical strain, particularly in tight bathroom spaces where leverage is limited.
Safety equipment should also be considered part of your toolset. Gloves, safety goggles, dust masks, and knee pads are essential to protect yourself from flying debris, sharp edges, and prolonged strain. With the right combination of tools and safety gear, demolition becomes a manageable process. A well-equipped workspace allows for methodical progress, enabling efficient removal of old fixtures while keeping safety and precision at the forefront of the project.
Safely Removing Fixtures and Cabinets
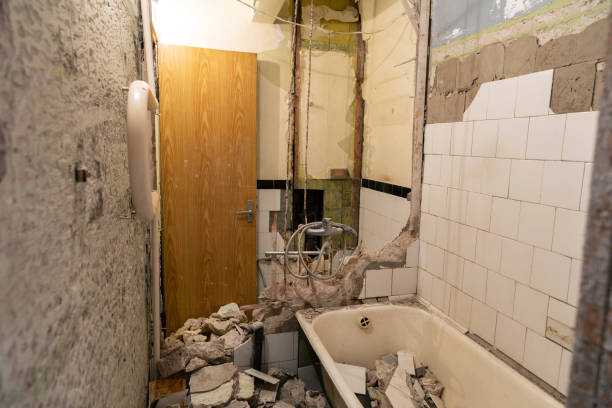
Bathroom demolition often starts with the removal of outdated fixtures and cabinets, which can be deceptively tricky. Faucets, sinks, vanities, and toilets must be carefully disconnected from plumbing systems to avoid leaks or damage. Cabinets often require careful prying to prevent breaking surrounding walls or tiles, and hardware like screws and nails should be collected to maintain a clutter-free space. Taking these precautions ensures a smoother transition to the next phase of renovation without causing unnecessary setbacks.
When removing larger elements like bathtubs or shower stalls, consider their weight and the best method for handling them. Disassembling components in sections may reduce strain and allow easier removal through doorways or tight hallways. Maintaining patience during these steps not only protects the structural integrity of your bathroom but also minimizes injury risk. Proper planning and a thoughtful approach make the process safer and faster, leading to a more organized and controlled demolition environment.
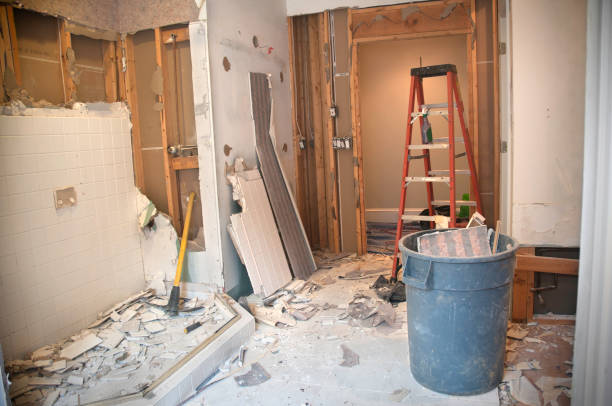
Managing Debris and Waste Efficiently
Demolition produces substantial amounts of debris, including tiles, drywall, cabinets, and broken fixtures. Efficient management begins with creating designated disposal areas and using heavy-duty trash bags or bins. Keeping debris contained reduces hazards and allows workers to move freely while removing old materials. Sorting items that can be recycled or donated also contributes to environmentally conscious practices, reducing unnecessary landfill waste and promoting sustainability during renovation.
Engaging a professional junk removal service can further streamline the process. Experienced teams handle heavy lifting and safe disposal, freeing you to focus on the actual renovation. By minimizing clutter and maintaining a clean workspace, you protect both yourself and the property. Efficient debris management not only speeds up the demolition process but also creates a more pleasant and functional environment for subsequent remodeling tasks.
Protecting Your Home During Demolition
Preventing damage to your home during bathroom demolition requires foresight and strategic planning. Covering floors, walls, and adjacent rooms with protective materials helps prevent scratches, dents, or accidental stains from tools and debris. Doors and windows should be sealed to reduce dust infiltration into other areas, maintaining a healthier living environment. Properly shielding surfaces ensures that demolition does not create additional repair work, saving time and money.
Ventilation is another crucial factor in protecting your home. Dust and fumes from old materials can compromise indoor air quality if not managed properly. Using fans, opening windows, and wearing appropriate masks reduces inhalation hazards while keeping your home cleaner. Thoughtful protection measures maintain both the condition of your property and the safety of all occupants, allowing demolition to proceed confidently and efficiently without unintended damage.
Understanding Plumbing and Electrical Considerations
Before any structural work begins, understanding your bathroom’s plumbing and electrical layout is critical. Incorrectly disconnecting water lines or electrical circuits can lead to costly damage, leaks, or hazards. Documenting where pipes, drains, and outlets are located aids in smooth fixture removal and ensures that renovation efforts align with existing systems. Awareness of these systems allows for safer adjustments or rerouting during remodeling.
Working with a professional, when necessary, provides peace of mind and prevents mistakes that could require expensive corrections. Even simple tasks like disconnecting a sink require knowledge of shutoff valves and pipe fittings. Proper planning around plumbing and electrical elements ensures that the demolition phase does not interfere with essential systems, keeping the renovation timeline on track and reducing the likelihood of unexpected setbacks or safety risks.
Removing Tiles and Flooring Effectively
One of the most labor-intensive aspects of bathroom demolition is removing tiles and flooring. Whether you’re dealing with ceramic, porcelain, or vinyl, starting from an edge and working methodically can make the process more manageable. Using a pry bar, hammer, and chisel, tiles can be lifted without excessive damage to the underlying subfloor. Protecting surrounding areas prevents chips and cracks from spreading beyond the immediate demolition zone.
For flooring materials such as laminate or vinyl, cutting into manageable sections before removal reduces strain and simplifies disposal. Paying attention to adhesive residues ensures a smooth surface for the next renovation step. Proper removal techniques maintain the structural integrity of your subfloor, prevent damage, and allow for a cleaner installation of new materials. Efficient flooring removal ultimately saves time and reduces unnecessary frustration.
Handling Hazardous Materials with Care
Older bathrooms can often contain hidden hazards such as asbestos in insulation or tiles, lead paint on walls, or mold behind walls and under flooring. These materials pose serious health risks if disturbed without proper precautions, including respiratory issues, skin irritation, or long-term complications from lead or asbestos exposure. Before starting demolition, it’s essential to identify and assess these potential hazards. Professional inspections can determine the presence and extent of these materials, ensuring that proper handling measures are implemented. Recognizing the risks early prevents unexpected exposure and allows the renovation to proceed safely.
When dealing with hazardous substances, protective equipment is indispensable. Gloves, respirators, protective suits, and eye protection safeguard workers from direct contact or inhalation of harmful particles. Containment methods such as sealing off the bathroom, using plastic sheeting, and employing negative air pressure systems can prevent contamination from spreading to other parts of the home. Additionally, compliance with local and federal regulations is vital, particularly for asbestos or lead removal. Licensed contractors are trained to remove these materials safely and dispose of them according to legal standards. By following strict safety protocols, homeowners and contractors protect themselves and their property, reducing liability risks. A careful, informed approach to hazardous material handling ensures that bathroom demolition progresses smoothly, creating a safe environment for the upcoming renovation phase.
Timing and Planning Your Demolition
Effective planning is a cornerstone of any successful bathroom demolition, turning what might seem like a chaotic process into a structured, efficient project. Creating a timeline for each step, from disconnecting plumbing and electrical lines to removing fixtures and flooring, ensures work proceeds in a logical sequence. Allocating specific days for individual tasks helps prevent bottlenecks and overlaps, allowing multiple contractors or workers to operate without conflict. Detailed scheduling also ensures coordination with plumbers, electricians, and waste removal services, so the project moves seamlessly from demolition to reconstruction. Proper planning reduces the risk of errors and keeps the renovation within budget.
Breaking demolition into manageable sections makes the process less overwhelming. Setting realistic daily goals encourages steady progress without the need to rush, which can compromise safety and lead to mistakes. It also allows homeowners to anticipate potential challenges and plan for contingencies, such as unexpected plumbing issues or the discovery of hidden water damage. Thoughtful scheduling includes preparation for debris removal, delivery of new materials, and compliance with safety measures like dust control and protective equipment usage. A well-structured timeline fosters productivity, reduces stress, and ensures that the demolition phase serves as a solid foundation for a smooth and successful bathroom renovation.
Renovation Preparation After Demolition
Once demolition is complete, the focus shifts to preparing the bathroom for the renovation phase. This stage involves thorough cleaning to remove all debris, dust, and leftover materials, creating a safe and organized workspace. Inspecting the exposed subfloor, walls, and plumbing is essential to identify any structural issues, water damage, or potential obstacles that could interfere with installation. Ensuring the space is level, free of hazards, and structurally sound prevents complications during the installation of new fixtures, cabinetry, or flooring. A well-prepared foundation sets the tone for a smooth, efficient renovation process.
Beyond cleaning and inspection, careful planning of the layout and design is crucial. Measuring spaces accurately and verifying the fit of cabinets, sinks, bathtubs, and tiles reduces mistakes and prevents costly rework. Coordination with contractors ensures that all components, including plumbing and electrical systems, align with the renovation plan. Checking materials, tools, and schedules in advance minimizes delays and allows for precise execution. Proper preparation at this stage maximizes efficiency and ensures that the finished bathroom is not only visually appealing but also functional and durable. Thoughtful attention to detail post-demolition ensures the project progresses seamlessly from a cleared space to a fully renovated, beautiful bathroom.
Conclusion
Bathroom demolition can be one of the most challenging aspects of a home renovation, but with proper planning, the right tools, and strict attention to safety, the process becomes manageable and efficient. From clearing out the space and carefully removing fixtures to handling debris and safely managing hazardous materials, each step demands precision and care. Following a systematic approach not only reduces the risk of accidents but also protects your home and ensures a smoother remodeling experience.
For professional help with debris removal or complete cleanout services, Clifford’s Junk Removal in Roseville, CA, can handle every step quickly and efficiently. Contact them at 916-232-3588 for reliable service and stress-free cleanup during your renovation project.